


Maintaining optimal air quality inside your vehicle is essential for both comfort and safety. Regular replacement of cabin air filters ensures that the air you breathe is free from dust, pollen, and other contaminants. Understanding when to change these filters can greatly impact your driving experience, particularly during allergy seasons or in urban environments with high pollution levels.
Equally important is the engine air filter, which plays a crucial role in the performance and efficiency of your vehicle. A clean engine air filter allows for better airflow, improving fuel efficiency and overall engine performance. Regularly monitoring the condition of this filter is vital, especially if you frequently drive in dusty or off-road conditions.
This guide provides comprehensive information on when to replace your air filters and practical tips to ensure you choose the right products for your vehicle. Adhering to a regular maintenance schedule not only prolongs the life of your vehicle but also enhances your overall driving experience.
When to Replace Your Cabin Filter for Optimal Air Quality
Your cabin air filter plays a crucial role in maintaining a clean and healthy environment inside your vehicle. It filters out dust, pollen, and other airborne particles, ensuring that the air you breathe while driving is free from pollutants. To optimize air quality, it is essential to know when to replace this filter.
The general recommendation for replacing your cabin filter is every 12,000 to 15,000 miles, but this can vary based on driving conditions. If you frequently drive in urban areas with heavy traffic, or in regions with high pollen counts, more frequent changes may be necessary. In contrast, highway driving in cleaner environments might extend the lifespan of the filter.
Listen to your vehicle. If you notice decreased airflow from the ventilation system, unusual odors, or an increase in dust accumulation inside the cabin, these are signs that your cabin filter may be clogged and needs replacement. Neglecting to change the filter can also impact the performance of the engine, as it may require more effort to intake fresh air, leading to increased fuel consumption and reduced efficiency.
Regular maintenance checks can help identify the condition of your cabin filter. During routine service, mechanics can visually inspect and replace the filter if necessary. Make sure to consult your vehicle’s manual for specific recommendations tailored to your model. Prioritizing this simple maintenance task will enhance both air quality and overall driving comfort.
Identifying Signs That Your Engine Filter Needs Replacement
Recognizing when your engine filter requires replacement is crucial for maintaining optimal vehicle performance. Here are key indicators to watch for:
1. Decreased Engine Performance: If you notice a decline in acceleration and overall engine responsiveness, it may be due to a clogged engine filter. This blockage restricts airflow, leading to inefficient combustion and reduced power.
2. Unusual Noises: Sounds such as hissing or wheezing during operation can indicate that your engine filter is obstructed. This can create irregular air intake, affecting engine performance and leading to potential damage over time.
3. Engine Warning Light: Many modern vehicles are equipped with sensors that monitor engine performance. If the check engine light illuminates on your dashboard, it could be a sign of a compromised engine filter requiring immediate attention.
4. Poor Fuel Efficiency: A dirty or damaged engine filter can lead to inefficient fuel combustion. If you experience a noticeable decrease in miles per gallon, consider inspecting your filter as it may need replacement.
5. Visual Inspection: Occasionally, a physical examination can reveal the condition of your engine filter. If it appears excessively dirty, discolored, or damaged, it’s time for a replacement to ensure your engine operates smoothly.
6. Frequent Cabin Filter Issues: A compromised engine filter can also impact your cabin filter. If you frequently replace your cabin filter due to odors or reduced airflow, the engine filter may be contributing to the problem. A clogged engine filter could be affecting air quality within the cabin.
Regular checks and maintenance of your engine filter can prevent further issues and enhance the longevity of your vehicle. Being proactive in identifying these signs will help you keep your engine running efficiently.
Step-by-Step Process for Replacing Cabin and Engine Filters
Replacing the cabin and engine filters in your vehicle is essential for maintaining air quality and engine performance. Follow these steps to ensure a thorough and effective replacement process.
1. Gather Necessary Tools and Materials: Before you begin, collect the required tools, including a screwdriver, pliers, and the new filters. Consult your vehicle’s manual for the correct filter specifications.
2. Turn Off the Engine: Make sure the vehicle is parked on a flat surface, and turn off the engine. Allow it to cool if it was recently running.
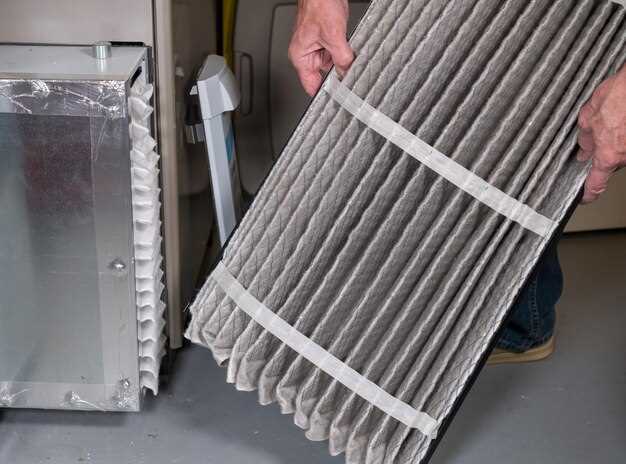
3. Locate the Cabin Filter: The cabin filter is typically located behind the glove compartment or under the dashboard. Open the glove compartment and remove any contents for easier access.
4. Remove the Cabin Filter Cover: If applicable, unscrew or unclip the cover protecting the cabin filter. Be gentle to avoid breaking any plastic components.
5. Extract the Old Cabin Filter: Carefully pull the old cabin filter out of its housing. Take note of its orientation (the direction of airflow) as you will need to install the new filter in the same way.
6. Install the New Cabin Filter: Insert the new filter into the housing, ensuring it is oriented correctly according to the airflow arrows. Replace the cover and secure it with screws or clips.
7. Locate the Engine Filter: The engine filter is usually found in the engine bay, often in a rectangular or cylindrical housing. Refer to your vehicle’s manual for the exact location.
8. Remove the Engine Filter Cover: If there is a cover over the engine filter, remove it using the appropriate tools. Be cautious of any clamps or fasteners that may be holding it in place.
9. Take Out the Old Engine Filter: Carefully lift the old engine filter out of its compartment. Check for any debris or dirt that may have collected around it.
10. Install the New Engine Filter: Place the new filter into the housing, ensuring it fits snugly and aligns correctly. Reattach any covers or clamps, making sure they are secure.
11. Check for Leaks: Start the engine and let it run briefly. Listen for any unusual noises and check for air or fluid leaks around the filter areas.
12. Dispose of Old Filters Properly: Dispose of the old cabin and engine filters in accordance with local regulations to ensure environmental safety.
By following these steps, you can effectively replace both the cabin and engine filters, ensuring optimal performance and air quality in your vehicle.


