


Braking systems are vital for the safety and performance of any vehicle, and brake pads are crucial components of this system. Understanding how to recognize when your brake pads need replacement is essential for maintaining optimal braking efficiency. In this guide, we will explore the key signs that indicate worn brake pads and provide step-by-step instructions for replacing them.
Recognizing the symptoms of degraded brake pads can prevent further damage to the braking system and enhance your driving safety. Common indicators include squeaking or grinding noises during braking, a pulsating brake pedal, or decreased braking responsiveness. By familiarizing yourself with these warning signs, you can take action early, ensuring a safer driving experience.
Replacing brake pads doesn’t have to be a daunting task. With some basic tools and this comprehensive guide, you can successfully complete the replacement process on your own. From gathering the necessary materials to the final installation steps, we will provide you with clear instructions to simplify the task. Empower yourself with the knowledge to maintain your vehicle’s braking system effectively.
Identifying Signs of Worn Brake Pads

Recognizing the signs of worn brake pads is crucial for maintaining your vehicle’s safety and performance. As a DIY enthusiast, understanding these indicators can help you decide when it’s time for a brake pad replacement.
One of the most common signs is the squeaking or squealing noise when braking. This sound typically results from a wear indicator that alerts you to replace the brake pads. If you hear this noise consistently while applying the brakes, it’s a clear signal to inspect your pads.
Another sign is a grinding noise, which indicates that the brake pads have worn down completely, allowing the metal backing to contact the rotor. This situation can cause severe damage to your braking system, so immediate attention is necessary.
You should also pay attention to the feel of the brake pedal. If it feels soft or spongy, there could be an issue with the brake fluid or other components, but it may also indicate worn pads. A hard or unresponsive pedal can suggest a problem with the brake system that needs investigation.
Visible signs of wear are important as well. If you can see the brake pads through the wheel spokes, check their thickness. A pad thickness of less than a quarter of an inch is a warning sign that replacement is needed. Additionally, look for uneven wear, which could suggest misalignment or other issues needing attention.
Finally, if your vehicle pulls to one side while braking, this inconsistency can indicate uneven wear on the brake pads. This situation can compromise your vehicle’s handling and safety, warranting immediate inspection.
By recognizing these signs early, you can ensure timely replacements, enhancing both your vehicle’s performance and your safety on the road.
Step-by-Step Process for Replacing Brake Pads
Replacing brake pads is a vital maintenance task that ensures your vehicle operates safely. Follow these steps to perform a reliable DIY brake pad replacement.
1. Gather Your Tools: Before starting, gather all necessary tools including a jack, jack stands, a lug wrench, a c-clamp, and a socket set. Ensure you also have the new brake pads ready for installation.
2. Prepare Your Vehicle: Park the vehicle on a flat surface and engage the parking brake. Loosen the lug nuts on the wheel of the brake you will be working on but do not remove them yet.
3. Lift the Vehicle: Using a jack, lift the car until the wheel is off the ground. Secure it with jack stands for safety. Remove the lug nuts and take the wheel off.
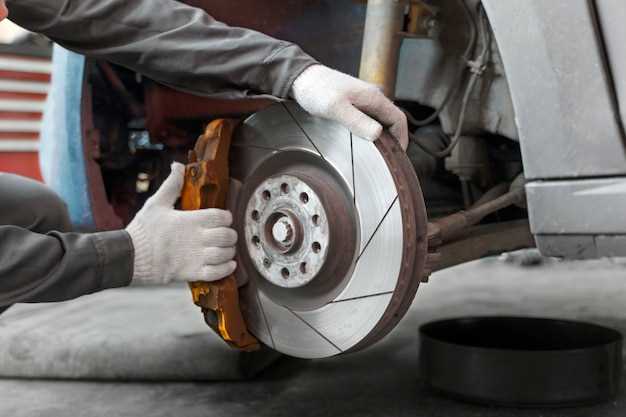
4. Access the Brake Caliper: Locate the brake caliper, which houses the brake pads. Use a socket to remove the caliper bolts carefully. Gently slide the caliper off the rotor and suspend it using a bungee cord or similar, to avoid stressing the brake line.
5. Remove Old Brake Pads: Take out the old brake pads from the caliper bracket. Pay attention to how they are positioned, as you’ll need to install the new pads in the same way.
6. Compress the Caliper Piston: Use a c-clamp to compress the caliper piston back into the caliper housing. This step creates space for the new, thicker brake pads. Make sure to place an old brake pad between the piston and the c-clamp to protect the piston surface.
7. Install New Brake Pads: Position the new brake pads into the caliper bracket. Ensure they fit snugly and are correctly aligned, as misalignment can cause reduced braking efficiency.
8. Reattach the Caliper: Carefully slide the caliper back over the new pads. Align it with the mounting bracket and secure it with the bolts you previously removed. Tighten the bolts to the manufacturer’s specifications.
9. Reinstall the Wheel: Place the wheel back onto the hub and hand-tighten the lug nuts. Lower the vehicle off the jack stands using the jack.
10. Finalize Installation: Once on the ground, tighten the lug nuts with a lug wrench in a criss-cross pattern to ensure even pressure. Finally, pump the brake pedal a few times to seat the new pads correctly.
After completing these steps, take your vehicle for a short test drive to ensure that everything is functioning properly. Regularly check for any unusual sounds or sensations while braking.
Tools and Materials Needed for DIY Brake Pad Replacement
To successfully replace brake pads, a specific set of tools and materials is essential. This guide will help you gather everything needed for a smooth DIY brake pad replacement process.
First and foremost, you will need a car jack and jack stands. These are crucial for lifting the vehicle safely to access the brake components. Ensure that the jack is rated for your vehicle’s weight, and always use jack stands for stability.
A lug wrench is required to remove the wheel nuts. It’s advisable to have a breaker bar for tough-to-remove nuts, as some may be excessively tight. Make sure to also have a torque wrench on hand to properly tighten nuts during reassembly.
For brake pad replacement, a set of socket wrenches is necessary. These will aid in removing the caliper bolts that hold the brake pads in place. Typically, a 12mm or 14mm socket is used, but it is best to check your vehicle’s specifications.
Additionally, you will require a caliper tool, which is used to retract the caliper pistons. This step is vital when fitting new, thicker brake pads. A C-clamp can be used in place of a caliper tool if you prefer a more cost-effective solution.
Brake cleaner is essential for cleaning the braking components, ensuring no debris or oil interferes with the new pads. It’s advisable to have disposable gloves and rags to maintain cleanliness during the process.
Finally, new brake pads are the most critical material needed for replacement. Ensure that you purchase pads compatible with your vehicle model. Depending on the setup, you may also need new hardware such as shims or clips to ensure the best installation.
By gathering these tools and materials beforehand, you will be well-prepared to follow the guide for replacing brake pads with confidence and efficiency.


